
How To - Deposit Redemption
When Aztec Deposit Redemption is enabled at Brand level and deposits have been taken for an account, host app users will be prompted to redeem booking deposits when seating a guest in Tables without needing to log into the POS terminal.
After a table number is selected, the user is prompted to Seat and Redeem the deposit associated with this account, seat without redeeming any deposit, or not to seat at all.
The value of the deposit is displayed in the prompt for information. If you choose not to seat the guest, the deposit is not redeemed.
![]()
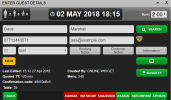
Once Seat and Redeem is selected, the guest’s account is updated with the deposit value as shown:
![]()
Users can press the Hide button in the Choose Party Size header to minimise the window at any point in the procedure. To return to the Choose Party Size window, press the Show button.
![]()
Quick Add
Quick Add allows you to add a walk-in customer to the Wait List quickly without capturing any personal information. The customer is also shown on the guest queue/guest summary.
Quick Add is only displayed if configured by Site Admin.
If PoS Integration is enabled for your company, when a walk-in customer is seated in Tables, an account is opened automatically in Aztec.
To add a walk-in customer:
-
Select the Add Guest icon in the header. The Choose Party Size window is displayed.
-
Select the Quick Add tab.
- Walk-in is populated automatically in place of the customer name.
-
Complete the following optional steps if configured / required:
-
Enter a customer name.
-
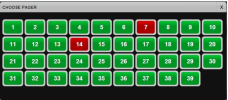
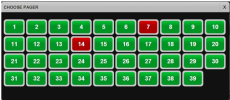
Enter the pager ID assigned to the customer, or if Pager by Button Selection is enabled, choose the Pager icon
 to select a pager.
 - Select an unallocated pager (green) or an allocated pager (red) to transfer the pager to the selected guest and remove it from the original guest.
- Select OK to confirm the change.
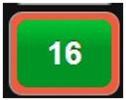
- If you return to the Choose Pager window, the selected pager will have a light red border.
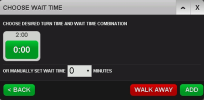
- Select the Turn / Wait times box to check the turn and wait time.
- The Choose Wait Time window is displayed:
- The system offers the tables with the best fit wait and turn time for the guest’s cover size. For example, you may be offered a reduced turn time where the guest can be seated immediately, or you may be offered the configured turn time where the guest has an extended wait.
- Select the required turn time icon or select the number of minutes the customer will need to wait manually from the drop-down list
- Select Next, or select Walk Away if the customer doesn’t want to wait for a table. (If Walk-Away is configured for your company.)
- If one of the suggested options is selected, the table is assigned automatically (if configured).
- The suggest table option can also be selected to choose a wait and turn time that best suits the guest. If a manual wait time is selected, you must select the suggest table option to choose the wait and turn time that best suits the guest.
-
-
Navigate to and select the table plan in the background and choose the table/tables to which the new customer will be assigned/ seated immediately.
-
The Choose Party Size window is closed automatically since the customer is now seated. You can use the Show/Hide button to minimise the window if required.
-
Select the number of adults by pressing one of the numbered icons and select Add
or
Select the number of adults, children and high-chairs required via the drop-down list and select Add. -
If waiting areas are set up, the Where are the Guests Waiting? window is displayed.
-
Select the appropriate button to select where the guest is waiting.
- The waiting area selected is displayed in the Notes area.
- If waiting areas are not set up, the guest will be marked as Arrived in the Notes area automatically.
![]()
![]()
![]()
Wait List
Wait List allows you to add customers to the wait list, capture personal details such as names and contact details, and allows you to add notes to the customer.
To add a new customer to the Wait List:
-
Select the Add Guest icon
 in the header. The Choose Party Size window is displayed.
 -
Select the Wait List tab.
- Complete the following optional steps if configured / required:
- Enter the pager number assigned to the customer, or if Pager by Button Selection is enabled, select the Pager icon
 to select a pager.
- Navigate to and select the table plan in the background to select one or more tables to which the new customer will be assigned / seated immediately.
Select an unallocated pager (green) or an allocated pager (red) to transfer the pager to the selected guest and remove it from the original guest.
Select OK to confirm the change.
If you return to the Choose Pager window, the selected pager will have a light red border.

- Enter the pager number assigned to the customer, or if Pager by Button Selection is enabled, select the Pager icon
-
Select the number of adults by pressing one of the numbered icons
or
Select the number of adults, children and high-chairs required using the drop-down menus and select Next -
The Choose Wait Time window is displayed.
- Select the required turn time icon or select the number of minutes the customer will need to wait manually from the drop-down list. Alternatively, choosing Next will automatically select the optimum turn and wait time combination.
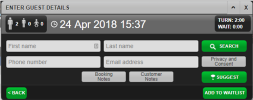
- Press Next to confirm the booking. The Enter Guest Details window is displayed.
or
Press Walk Away if the customer decides to leave the premises rather than wait. Then press OK to confirm that the customer has left. -
Enter the last name or first and last name of the customer into the appropriate entry fields.
-
Complete the following optional steps if configured / required:
-
Select Search in the Enter Guest Details window to find all customers with the names entered. If a customer is already on the system, selecting them will populate the form with any existing details.
-
Enter a phone number and email address and select a check-box to indicate how the customer would prefer to be contacted for any marketing initiatives. In order to opt-in, a mobile phone number or an email address is required.
-
Enter a phone number and email address and select a check-box to indicate how the customer would prefer to be contacted for any marketing initiatives. In order to opt-in, a mobile phone number or an email address is required
-
Enter your Server ID in the ID field.
-
Select the required store zone from the drop-down list. If you don’t have store zones set up for your company, this option will not be displayed.
-
Enter the Company Name associated with this guest (if required). If you don’t have the Company Name field enabled for your brand, this option will not be displayed.
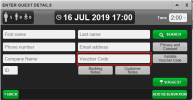
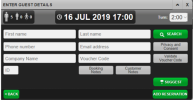
When a company name has been entered, this will be added to the customer details on the following screens as shown: - Enter a Voucher Code if required, and if configured for your site
-
After entering a voucher code, you can select Validate Voucher Code to check with Voucher Manager that the code you entered is valid.
-
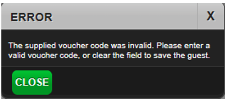
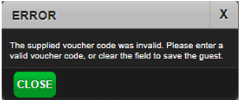
If an invalid voucher code is entered, the system will not allow you to add the new reservation.
You will be prompted to enter a valid voucher code or clear the field before the guest can be saved: -
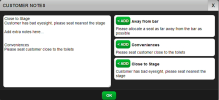
Select Booking Notes and/or Customer Notes to enter key information about this booking and/or this customer.
If a phone number or email address has been entered, customer notes will be retained by the system for subsequent bookings, so users can enter information about preferences or allergies in this box. Booking notes are only retained for this reservation.
Booking Notes and Customer Notes created in Events are displayed in Tables. Tables users can update these notes and the revised note will be visible from both Events and Tables. If both names and the phone number or email address match a registration in LiveRES Loyalty, the Loyalty logo will be displayed beside the Information button, as shown below: - Select Add to select a pre-defined note from the available list. Pre-defined notes are composed by Brand or Site Admin users. Host users cannot edit the predefined message, but once selected users can change a message or add to it as required. Select OK when complete.
 .
.

-
-
When creating a new Wait List booking, you can record the customer’s Privacy and Consent preferences by selecting the Privacy and Consent button. Users can opt in to receive communications via their preferred media. Up to six consent fields may be displayed if configured including:
Email
Telephone calls
Text messages (SMS)
Post
Mobile application
Profiling
- You can also edit the pager number assigned to the customer in this window.
-
If you need to change the estimated wait time, press the Turn/Wait icon to return to Choose Wait Time window.
-
If you know the table or tables to which you intend to seat the customer, you can navigate to the table plan in the background and select one or more tables to seat the customer.
If you don’t know the table, Tables can suggest a particular table for the selected customer. For a seat suggestion, select the Suggest icon.
-
The Seat Suggestion window is displayed.
- Select the required table.
-
You are returned to the Enter Guest Details window.
or
If auto assign tables is enabled for your site, a table will be assigned automatically. -
When you return to the Reservations tab, the assigned table number will also be displayed in the Notes area:
-
To put this customer on the wait list, select Add to Waitlist.
The customer’s information is added to the Wait List and the counter will start counting down. A note about the number of highchairs needed and the number available in the restaurant is added to the Notes column of the Wait list. For example, if a party has three children and needs two highchairs, the note will read KIDS/HCHRS: 3/2”.
![]()
The total number of covers includes both adults and children together. This combined value is used for counting capacity and for reporting.
![]()
If there is insufficient capacity for the booking, the tables will be shown in red. If configured (by site admin), you can override this by selecting a timeslot and entering an authorisation PIN when prompted:
![]()
![]()
Choose all acceptable methods of communication and select OK.
![]()
Tables highlights one table in yellow as the most suitable for the customer; other suitable tables are shown in green. Tables that are not currently free or have more seats than are required are highlighted in orange. The following information is displayed:
![]()
If Server Rotation is enabled, the Seat Suggestion window for the Wait List will show the on-duty servers and a list of available tables for each server.
![]()
![]()
If the site is set up for Pager IDs, a free text box is added at the end of each row of the wait list for site staff to assign a specific pager to each customer. Once a pager number has been entered, a confirmation message is briefly displayed to inform the user that the pager ID has been changed.
![]()
If guest waiting areas are set up for your site, you will be prompted to select the waiting area where your customer will be until called.
![]()
To see a customer’s name and information, select the name in the wait list or choose the info button.
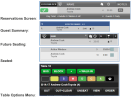
Reservations
To add a new reservation:
- If this is a returning customer, select the Search icon in the header and enter the customer’s surname, mobile phone number or email into the Search field.
- Choose the required customer from the list. If this is a new customer, press the Add Guest icon
 in the header. The Choose Party Size window is displayed.
 - Select the Reservation tab. (Not required if the Reservations window was selected.)
- If the table plan is in the background, you can select one or more tables to which the new customer will be assigned/ seated immediately.
- Select the number of adults by pressing one of the numbered icons
or
Select the number of adults, children and high-chairs required using the drop-down menus and select Next. - The Choose Reservation Time window is displayed.
- Select the date using the calendar icon or by selecting from the drop-down menus.
- Select a session from the available list.
- The Enter Guest Details window is displayed.
- Enter the first and last names of the customer into the appropriate entry fields.
-
Enter a phone number and email address and select a check-box to indicate how the customer would prefer to be contacted in case of any changes to the reservation and for any marketing initiatives.
If a deposit or payment is required, enter an email address to which the demand for payment can be sent. If both names and the phone number or email address match a registration in liveRES Loyalty, the Loyalty logo will be displayed beside the Information button as shown: - When creating a new reservation, you can record the customer’s Privacy and Consent preferences by selecting the Privacy and Consent button.
- Choose the acceptable methods of communication and select OK.
-
Complete the following optional steps if configured / required:
-
Select the required store zone from the drop-down list.
-
Enter the Company Name associated with this reservation (if required). If you don’t have the Company Name field enabled for your brand, this option will not be displayed.
When the company name has been entered, this will be added to the customer details on the Future Seating, and Reservations screens in the first instance.
Once seated, the information will be displayed on the Guest Summary, Seated tab and Reservations screens -
Enter a Voucher Code if required, and if configured for your site.
- Select Booking Notes and/or Customer Notes to enter any special requests for the party.
Customer Notes will be retained by the system for subsequent bookings, so users could perhaps enter information about preferences or allergies in this box.
After entering a voucher code, you can select Validate Voucher Code to check with Voucher Manager that the code you entered is valid.
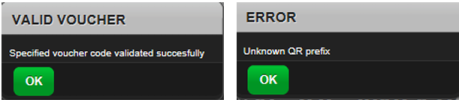
If an invalid voucher code is entered, the system won’t allow you to add the new reservation.
You will be prompted to enter a valid voucher code or clear the field before the guest can be saved:
-
- Select the required turn time by selecting from the drop-down list.
If auto assign tables is enabled for your site, a table will be assigned automatically.
When you return to the Future Seating tab on the Table Planning page, the assigned table number will be displayed: - To suggest a particular table for the selected customer, select the Suggest icon
 . The Seat Suggestion window is displayed.
 - Tables highlights one table in yellow as the most suitable for the customer; other suitable tables are shown in green. Tables that are not currently free or have more seats than are required are highlighted in orange.
The following information is displayed: - Select the required table.
- If a deposit has been taken for the guest, you will be prompted to Seat and redeem the deposit or Seat without Redeeming the deposit.
- You are returned to the Enter Guest Details window.
-
Press Add Reservation to save the reservation details. A message is displayed at the bottom of the screen to confirm that the reservation has been added successfully.
![]()
![]()
![]()
If Table Availability has been enabled for your site and there are no tables available a cross will be displayed next to the table icon. If a session is fully booked or lacks the capacity for the cover count, the time is highlighted in red. If configured (by site admin), you can override this by selecting a timeslot and entering an authorisation PIN when prompted:
![]()
Select the required reservation time from the available list. The numbers underneath the booking times represent the current number of booked customers / total capacity for that timeslot.
![]()
![]()
![]()
![]()
or
![]()
![]()
![]()
If a customer joins LiveRES Loyalty after making a reservation, the Loyalty icon will be added to the customer information page automatically.
Reservations Booking Journey
If the Reservations Booking Journey is configured for your site, then after choosing a timeslot staff will be prompted to select offers, menus and amend the deposit and/or payment values.
The following diagram shows the possible actions that staff might need to complete:
![]()
- If a Reservations Booking Journey has been enabled and configured within liveRES Reservations to include Menus and Offers, you will be prompted to choose an offer from the available list.
(If no offers have been configured, you will either be prompted to choose a menu - if so, proceed to step 3- or you will be returned to the Enter Guest Details window - if so, continue with procedure described previously.
Offers highlighted in red are fully booked. - Select the required offer, or select No Offer if the cover does not want one.
If you select an offer that has a multi-use voucher code, the voucher code will be populated automatically (If Voucher Manager is enabled and the code is valid.) -
If configured (by site admin), you will be prompted to enter an authorisation PIN.
- Any offers selected will be displayed on the Reservations Summary screen.
If No Offer is selected and no menus or deposits have been configured, the Enter Guest Details window is displayed (if so, continue with procedure described previously).
If menus have been configured and there is a menu that is valid for the date, time and number of covers entered, the Select Adult Menu window is displayed: - Select the desired menu.
Any menus selected will be displayed on the Reservations Summary screen.
If there is a child on the reservation and there is a menu configured in liveRES Reservations that is valid for the date, time and number of covers entered you will be prompted to choose a child’s menu: - Select the desired menu.
If the selected offer or menu has a deposit payment requirement you will be prompted to confirm and continue. - Amend the deposit and/or payment requirement if required.
- If configured (by site admin), you will be prompted to enter an authorisation PIN before you can proceed.
- Select Confirm and Continue.
- You are taken to the Enter Guest Details window and can continue creating the reservation as normal.
-
The Deposit and Payment Requirements window displays a note to remind the user to capture the guest’s email address once back on the Enter Guest Details window. This is to allow the system to send the guest a payment link for the deposit/payment to be made.
![]()
![]()
![]()
![]()
![]()
If a deposit is required, a Deposit label is displayed on the Reservations Summary screen. This will remain displayed until the total deposit requirement has been received.
If the site has the ability to amend deposit and payment details you will be prompted to amend the values:
![]()
If a payment is required, a Deposit label is displayed on the Reservations Summary screen. This will remain displayed until the total payment requirement has been received.
If the site has the ability to amend deposit and payment details you will be prompted to amend the values:
![]()
![]()
![]()
If a menu was chosen by a guest in the Events app, the name of the menu will be displayed in the notes section as above. Tables users cannot return to the Menu Selection screen to make changes for that guest. The guest will need to return to the Events portal to change a menu selection.
Events Booking Journey
If the Events Booking Journey is configured for your site, after choosing a timeslot, staff are prompted to select occasions and menus.
Bookings created in Tables using the Events booking journey will be fully editable from Events as well as Tables, but Bookings created in Events are not fully editable in Tables.
- If an Events Booking Journey has been enabled and configured within liveRES Reservations to include Occasions, you will be prompted to choose an occasion from the available list. Occasions highlighted in red are fully booked.
- Select the required occasion.
- The Occasion Select buttons will turn red if the specifics of the occasion mean that the occasion can’t be accommodated. This can be over-ridden by the host.
- The Choose Menu window is displayed:
- Select the desired menu, or select No Menu to move to the Guest Requirements window.
- Select Confirm and Continue.
- You are taken to the Enter Guest Details window and can continue creating the reservation as normal.
![]()
If there are no occasions associated with the selected booking, a warning will be displayed to inform the user that the reservation will not be shown in Events.
![]()
If menus have not been configured to be mandatory (as defined in Events Admin) users will be able to select No Menu.
![]()
If Pre-authorisation is required, this will be stated along with its due by date(it will say ‘Pre-Authorisation required by due date).
If a deposit is required, the amount and the payment date is displayed.
If Pre-order is required, this is described and the cut-off date is displayed. A reminder is shown to prompt the host to ask the guest for their contact email details so that they can make their selections, add payment details and pay.
If the site has the ability to amend deposit and payment details you will be prompted to amend the values:
![]()
If a payment is required, a Deposit label is displayed on the Reservations Summary screen. This will remain displayed until the total payment requirement has been received.
The Deposit and Payment Requirements window displays a note to remind the user to capture the guest’s email address once back on the Enter Guest Details window. This is to allow the system to send the guest a payment link for the deposit/payment to be made.
![]()
If a menu was chosen by a guest in the Events app, the name of the menu will be displayed in the notes section as above. Any emails that are generated as a result of changes made in Tables will be sent from Events.